Thursday, July 29, 2010

Things are definitely moving on...

Well it's been a while between posts and that's mainly due to the fact that there's been so much going on both onsite and off.  We've moved house 3 times in the last 3 months so between that and working on the house, there hasn't been a lot of time to devote to postings.  Now that we have some shelter the straw walls are going up fast.

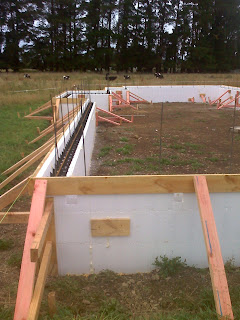
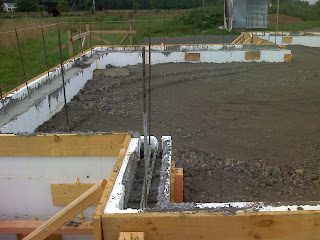
Joe has been busy cutting and shaping bales to fit them around posts and window openings.  The bales sit on a bottom plate filled with pea gravel.

We're not using rebar starters as they tend to cause condensation problems later on.  Instead we are using small dimension battens running from the floor to the roof on the outside of the bales.  These are cut into the face of the bales and tied together with wire forming a kind of ladder truss.  The strength of this simple design is surprisingly good and we have the added benefit of having something to attach paintings and shelves to later on. We are pinning the walls internally with wooden stakes but that's only to stop them toppling over before we get the external battens on.
The windows for the house are very simple carpentry windows made using panes I found on Trademe. These will be non-opening and will have fixed wooden louvres on the side for ventilation. I'll show you some close ups of these once they're in.  In the meantime here's a shot of the macrocarpa sills that Jamie Ticehurst (our local sawmill) cut for us.


Not only are the straw walls going up fast but the timber ones are too.  We are using 150mm framing for these with cavity battens to improve the weather proofing.


The weather is definitely starting to get cool. The rain has been fairly persistent but when it stops the frost is magnificent.

That's about all I can manage at the moment.  I'll try to keep you updated a bit more regularly and give you some more details about the various systems that are going in.  It's a real whirlwind onsite right now with all the different trades showing up and doing their things - lots of stuff to report to you on...

Friday, June 4, 2010

The roof is on and the walls are going up

As the title says - we have a roof!  It actually went on really quickly and no sooner was it done then the builders were ripping into the walls.  At this stage you might be scratching your head as to why we'd have a roof on before the walls and if this were a conventional house you'd be entitled to that confusion. However unlike a conventional house, this house's structure is all in the heavy poles that surround the foundation.  This allows us to complete the roof before starting on building the straw walls underneath.  As you can imagine, straw is not a building material that likes to be wet or even damp.  If we were to build this house in the conventional sequence, we'd end up exposing the straw walls to the elements to disastrous effect. In fact a straw house in the area started rotting before the roof was on for precisely this reason.  Building the house top down has allowed us a dry and sheltered area to work and has eliminated the risk of us having a composting house before we even move in. Now the builders can work in a protected and stable environment, unconcerned by whatever nature throws at them.  Because of that the walls have started to go up really quickly.

From Roof and walls
Here's the view from the kitchen.  You can see the magnificent Tararua Range in the distance.  These walls are 150mm timber frame to allow for extra thick insulation.

From Roof and walls
 The view through the front door is pretty imposing too.  I love the way it's framed by the massive poles.

From Roof and wallsFrom Roof and walls
  Here's a view of the inside. There are a lot more walls going in soon so it won't look so open and airy.

You're probably wondering where all the straw is going as I've only shown you the timber framed stuff.  We've gone for timber framed walls on the exposed sides of the house and kept the straw well sheltered under our huge overhangs.  This is what the base of the straw walls look like:
From Roof and wallsFrom Roof and walls
What you can see is a 150mm x 50mm outer floor plate and a 100mm x 50mm inner floor plate. The gap in the middle is painted with Mulseal to stop moisture from penetrating the wall from the slab.  The gap between the plates will be filled with pea gravel to support the bales and keep them dry if the floor gets flooded (e.g. washing machine overflows).  


From Roof and walls
I've placed a bale on the floor plates to show you how they'll sit.  I'll save the description of how the wall holds together for a future post. Until then you can ponder where the rebar stakes are...

Wednesday, May 19, 2010

Rafters and Purlins

Now that the poles have been concreted in the guys have been very busy putting up the roof members.  The big rafters are spanning gaps of up to 6 metres. These were actually pretty hard to find because they're an unusual spec (i.e.300x50mm, gauged, kiln dried H3.2). I'll try and explain what it all means:
  • 300x50 is required to provide enough rigidity and strength over the span (as per NZS3604)
  • Gauged means smoothed and planed off to an even dimension all around
  • Kiln dried means it's been force dried so that it won't bow or twist once it's gone up
  • H3.2 is treated for outside exposure. If the rafters remained 100% inside the walls then we could have gone with H3.1 which was more readily available but then we lost the integral verandahs. 
The purlins (the ones that go across the roof) are 250 x 50 gauged, kiln dried, H3.2 and they're spanning up to 3.5 metres in places.

This is different from most houses because we're not using trusses to support the roof. Trusses are strong and easy to make offsite from standard 100x50 timber but they didn't give us the high raking ceilings that we wanted.  We needed something that could support the roof, thick insulation and ceiling yet remain stiff enough to span the width of a room.


Changing plans already

One of the nice things about working with Dale is that he's pretty flexible when it comes to the finer details.  When I was looking up at the purlins one morning I had a hard time imagining the finished roof with the thick edges that were shown on the plan.  I thought that if we tapered the purlins off at the overhangs they'd end up making the roof look lighter and less heavyset (a nice juxtaposition with the thickness and weight of the poles). A quick word to Dale and we were cutting test pieces and trying them out on the rafters.  I think you'll agree it ended up looking pretty good.


Stay tuned for photos of the finished roof...

Wednesday, April 21, 2010

Going up

Working with the sun
So the slab's been down for a while now and we're waiting on timber to arrive.  Our design is unusual in a number of ways - mainly due to trying to accommodate two rather conflicting requirements. Because we want our house to capture as much heat from the sun as possible we need it to be oriented to the north (i.e. long axis of the house running east-west) and have a whole lot of windows on that side to let the sun in.  The concrete floor is also thicker on the north side to capture as much of this solar heat as possible. In order to let the sun in the eaves have to be a certain length (around 600mm) and this is where we run into conflicts with our requirement for straw bale walls.

A good hat
For straw to perform at all as a viable building material it must be kept dry.  Exposure to driven rain is fatal and commonly results in walls turning to compost. In fact any moisture in the right conditions can lead to spontaneous combustion which would definitely ruin the fun.  Our carefully calculated overhangs on the north side of the house were just too small to provide enough protection from the elements.  Because of this we decided to construct these walls from more traditional plywood board and batten over timber framing. In order to keep the heat in we upsized the framing to 150mm to accommodate thicker insulation. Where we don't need the sun to come in we have gone with nice wide bale walls to provide an insulation value of up to R9 (most walls in NZ are R1.8 so this is big step up).  To shelter these walls we have specified a 3.5m wide verandah all around the outside of the house.  This has the added benefit of providing great additional year round living space and makes the house feel much more comfortable in summer.  Now because of the need for all this extra roof we had a hard time coming up with a design that would give us what we wanted and not end up looking totally bizarre.
You're going to live in a shed?
As a result of an epiphany that I had on the train we started looking at using two off-the-shelf farm pole sheds to provide the structure. To get practice, I built a smaller one onsite to store our bales in.  Facing the two pole sheds together (one higher than the other) gave us the ability to let light into the bedrooms on the shady side of the house.  The pole structure also meant that the roof was now fully supported without needing walls.  This was great for our straw walls as they were now much simpler to build, and it let us have the huge overhangs required without adding complexity to the roofline and building profile.  E Rua Pataka was born (a pataka is a Maori storehouse or shed).

Water, water everywhere...
In the end we didn't use off the shelf kitsets but the overall concept still comes through in the final design.  What this meant though is that most of the structure of the house was in some fairly non-standard dimensions and grades.  The poles are specially sourced from Goldpine for their strength and consistency. The rafters need to be very long (sometimes spanning up to 6m) and very deep (300mm) as well as being able to withstand the elements (H3.2). Strangely - in a country brimming with trees - we couldn't seem to be able to source the stuff.

Up she goes
While the guys were waiting for the big stuff to arrive they got the internal posts up.  These are 150mm square props to support the roof and are bolted fairly solidly to the floor.
Timber!
The poles arrived first (all 20 of them) and it put a huge smile on my face to finally see them.


I got an even bigger kick when the poles went in and we could finally see the full footprint of the house. Those verandahs are definitely deep - you can literally drive a car between the poles and the side of the house!


We're still waiting on the rest of the timber to arrive for the rafters and purlins, but it's great to see some definite progress.

Monday, April 19, 2010

Getting a slab

Before I start getting into all the design decisions and cool technical stuff about the house I thought it'd be better to post a few photos to show you where things are at and how far we've come. So this post is devoted to getting the slab down.

The excavations for the concrete footing
It all started with the excavations for the footings - done back in January.

Once the footing was poured the guys put up the polyblock foundations. These are like big legos with a cavity in the centre that is filled with concrete. The resulting walls are strong but very well insulated.
Polyblock foundations going up. February 1, 2010

Foundation poured and centre being filled with river run
The foundation is then poured, and the centre of the slab filled with gravel. The final floor height will be 900mm above the ground (to remain well above any flooding from our water race).

There's a truck in my bedroom! February 11, 2010Here's Robin dumping a load of 40mm basecourse. This is the last layer of gravel to go on before the sand and then black plastic.


After the plastic is down, on goes the 50mm poly insulation and steel mesh. Onto this is attached the pipes for the underfloor heating system. Dale and the plumber are sorting out the tangle of pipes as to make sure they'll exit the slab cleanly and in the right place.

Prepping for the pour March 11, 2010

Once all the prep is done the foundations are ready for the final pour. Ours was delayed a few days due to bad weather but when I arrived at the site that evening, this is what I saw...
The finished slab March 15, 2010Needless to say I was very happy! The kids were too as the could immediately see the skateboarding potential.


Apologies for the terrible layout - I'm still learning how to drive this interface...

Sunday, April 4, 2010

So here we are


Everyone we have spoken to about our project has asked the same question "Have you got a blog?". The answer has always been "No - not yet" or "Watch this space". They've been asking these questions for almost three years now and it's about time we did something about it.

So what is this project and why did people find it interesting when we gave them the spiel?

As the blog description says - we're a domesticated urban family that decided to sell our beautifully renovated house in Wellington and up stakes to a 2.5 hectare bare land block in the country. The reasons for the move are many and varied and will probably be covered in future posts, but nevertheless move we did and at the time of writing this we're in the throes of building a energy efficient, passive solar, strawbale house in Carterton, Wairarapa.

This whole thing is part of a series of lifestyle changes that will hopefully see us relying less on industrialised, mass produced goods and services and more on traditional, local and sustainable alternatives.